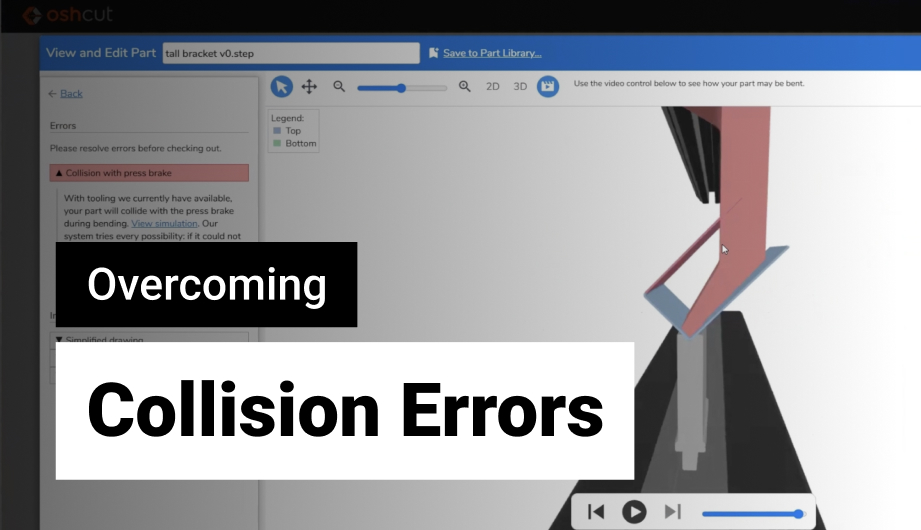
Understanding collision errors and knowing a few simple tricks to overcoming them.
Video Transcript:
Let’s walk through some of the ways that you can deal with collision errors when you’ve uploaded your parts into our system. To give you some context, when you upload a sheet metal part into our system, we unfold it and then we refold it on our tools just to make sure we can make it. And if we can’t make it, we’ll show you why we can’t make it. And now in this video we are going to talk about some of the things that you can do to fix that when it happens.
So let’s start from the beginning and let’s make a new part. I’ve opened Fusion 360 here, and I’m going to make a sheet metal part that definitely will collide with the tools. I’m going to start with a 2 inch base and, you know, maybe make it 4 inches wide. I did this in a new sketch. Then I’ll go to the sheet metal tool. I’ll create a new flange and select that feature. And then the sheet metal rule I’ve selected is 0.06 inch steel, so good enough. Now I’ll create a flange up here with this tool, I’ll pick these 2 edges, and then I’ll pull them up. I’m going to make those, let’s see, we’ve got a 2 inch base, so a 4 inch tall channel is going to be too tall for sure. Alright, I’m going to call this just a tall bracket. We’ll leave it simple just for the purposes of illustration here. Alright, I’m going to export this. Make sure that it’s a step model that’s selected. And it’s going to my downloads folder.
Let’s go to the OSH Cut instant quoting app and upload that part. Here we are, tall bracket version 0. Uploads and processes. Alright, recall that we did 0.06 inch steel, so I will grab that. Found one error so let’s take a look at it. This part has one error, collision with a press brake. So there’s the flat pattern. Notice, just as an aside, we didn’t have to create the flat pattern in Fusion 360. OSH Cut will do that. Here’s the part, it does match. Here’s the bend simulation. Now you can kind of see what’s going on there. It tried to swap in a swan neck punch to allow this bend to be performed but still, there’s a bit too much right there.
Okay, so what do you do when this happens? Well we could go in and we could start making these flanges shorter to try to see how deep we can go. But there’s also another kind of shortcut. If you go to our website, just oshcut.com, go to resources and design guide, and then scroll down to brake tooling. So there’s a few things you can do. Number 1, use a bend limit graph and we’ll walk over some of that stuff down below. You can actually download the DXF tool profile and then we could import that into Fusion 360 and we could put that in and try to match the tool profile with the part until it works. Or we could just iterate and upload and check again and again until it works. But if you scroll down here, here’s our swan neck punch, here’s the flange height and the base length. But in here we’ve actually plotted how deep you can go on a swan neck based on the base length. So the base length on our is 2 inches, that means we can go slightly over 3 inches tall before it collides. So I’ll go back to Fusion 360, and I’m going to click on this flange that we made, and I’m gonna say 3 inches. That’s about as deep as we can go on a swan neck punch. Save that. And then I’m going to re-export this as a step model, go back to the instant quote system. I’ll just go ahead and delete this part since we can’t make it. And then let's go tall bracket V1. Choose the material, same thing we did before. And it passes. Let’s take a look at that. So we’ve got a straight punch for the first bend, then we switch over to the swan neck and there we go. Looks like we could go a little bit further but if you watch this bend simulation slowly, looks whats happening. It actually goes over, and then springs back a little bit. So spring back is required, we have to overbend just a little bit, and then because the metal kind of has some memory, it’ll spring back a little bit. So we have to over bend very slightly to avoid spring back problems. So you don’t always want to push exactly up to the edge. You might want to give it a little bit of clearance to make sure that we can make the part. But overall, there you have it.
Now it can get a little bit more complicated if you have what’s called a return flange, meaning a flange that goes inward like this. And in that case, sometimes importing the tool straight into Fusion 360 and then building your part around that tool. Or iterating and checking is an alternative solution that can work well.